Tutorial: Use personal gmail with @yourdomain.com
A common question from people acquiring a new domain is, “What e-mail service should I use?”. My answer is not what not what most people expect – that they should use their personal Gmail or outlook account for the domain’s email.
This tutorial describes how to setup redirection of domain email to personal email accounts using Postfix. The advantages:
- one location for email;
- solid spam filtering; and
- no expenditures on email services.
The tutorial uses Gmail, but works equally well with outlook.com.
Setting it up is a 6 step process:
Pre-requisites:
- Access to a Linux server on the internet
Tested on:
- Ubuntu 14.04 on DigitalOcean
0. Architectural overview
The components and the flow that you’ll end up with is shown in
Figure 1. All mail from the internet to domain.com is sent through
mail.domain.com. And, all mail sent from the personal Gmail account
is sent through mail.domain.com.

1. Install Postfix
First step is installing a mail server. We install Postfix.
$ apt-get --yes install postfix && service postfix stop
Postfix is stopped immediately, which lets us configure and secure it
before letting it loose on the internet. Chose Internet Site when
asked for mail server type and enter the FQDN of the server when asked
for system mail name.
2. Redirect mails in Postfix
Our goal is to redirect all mail to our domain to individual e-mail
addresses. Postfix is setup to redirect mail for a domain by adding
the domain to the virtual_alias_domains variable.
$ postconf 'virtual_alias_domains = domain.com'
$ postconf 'virtual_alias_maps = hash:/etc/postfix/virtual'
Postfix now accepts incoming mail for domain.com. The next step, is
to configure where incoming mail is redirected. This is setup in a
database, with in-2-out address mappings, pointed to in the
virtual_alias_maps variable.
We update the map with relevant in-out addresses. Remember to add
postmaster@domain.com; it is required per
RFC 5321.
info@domain.com user@gmail.com
jakob@domain.com user@gmail.com
postmaster@domain.com user@gmail.com
More about the format: http://www.postfix.org/virtual.5.html
After updates the map must be compiled with postmap.
$ postmap /etc/postfix/virtual
3. SMTP authentication in Postfix with Dovecot
Did you notice we stopped the Postfix service immediately after installing? Before starting it up on the evil internet, it is prudent we add authentication. Postfix uses Simple Authentication and Security Layer (SASL), described in RFC 4422, for authentication. SASL is a layer added in between Postfix and different authentication schemes.
There are two Postfix plugin options that can handle SASL: Dovecot and Cyrus. I tried Cyrus, and gave up after getting the following coveted error:
Sep 21 12:40:33 server postfix/smtpd[424]: warning: SASL authentication failure: Password verification failed
And yes I did verify the password with testsaslauthd with
success. So instead, we go and install Dovecot.
$ apt-get install dovecot-core
The Dovecot installation creates an un-signed SSL certificate for TLS encryption — beware of the infamous man-in-the-middle.
After installing Dovecot we enable it in Postfix, by issuing the following commands:
$ postconf 'smtpd_sasl_type = dovecot'
$ postconf 'smtpd_sasl_auth_enable = yes'
$ postconf 'smtpd_tls_key_file = /etc/dovecot/private/dovecot.pem'
The Dovecot configuration must be updated so it allows and listens for authentication requests from the Postfix user. Find the Postfix section in the configration file, and update with the data underneath.
unix_listener /var/spool/postfix/private/auth {
  mode = 0660
  user = postfix
  group = postfix
}
Per default Dovecot is configured to pass authentication requests to the system’s user database, i.e., /etc/passwd. Alternatives are available: http://wiki.dovecot.org/UserDatabase. Therefore we must add a user account to the server – we’ll use this to connect from the mail-client.
$ adduser john
We’re now ready to reload the Dovecot configuration and start our mail server:
$ service dovecot reload
$ service postfix start
4. Update DNS
Still, the internet is unaware of domain.com’s new mail server
running at mail.domain.com. To indicate which server handles mail
for domain.com, we add an MX record, pointing to the server - this
is done at the DNS provider. The update can take some time to
propagate, but, usually it updates fast. Verify DNS with dig
$ dig -t mx +short domain.com
10 mail.domain.com.
5. Setup mail client to use mail-server
Now we need to setup Gmail to use the mail server. This allows redirected e-mail from the new mail server into Gmail. In addition, Gmail uses the mail server when sending from domain.com, as depicted in Figure 1.
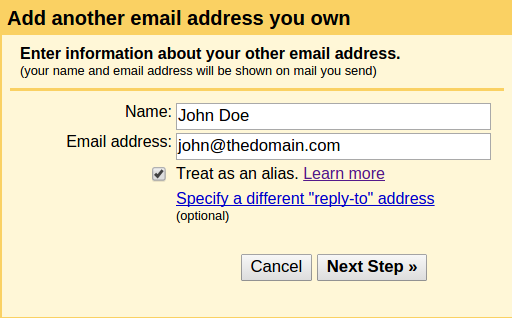
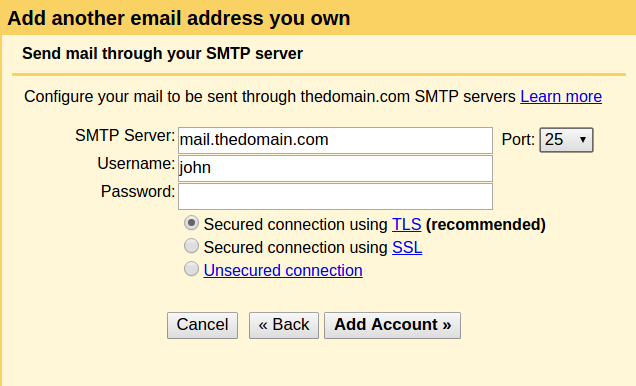
To setup Gmail, in Gmail click settings -> accounts and imports -> add another email address you own. Fill in information as depicted in Figure 2 and Figure 3.
5. Securing the server with fail2ban
The server is now open on SMTP port 25. This means attacks on that port will begin. One security measure to take is to lock out computers that tries to access with a wrong username / password. Fail2ban is a tool that scans server logs and bans servers that tries to gain illegal access. Fail2ban locks out attackers by updating the firewall.
Install fail2ban
$ apt-get install fail2ban
Create a configuration file /etc/fail2ban/jail.local that specifies which services to protect - ssh is protected per default.
[DEFAULT]
# ban until restart
bantime  = -1

[postfix]
enabled  = true
# ban immediately
maxretry = 0

[sasl]
enabled  = true
maxretry = 0

[dovecot]
enabled = true
maxretry = 0
Illegal access is banned immediately maxretry = 0 and forever bantime = -1.
We are now ready to see fail2ban in action. Reload configuration
$ service fail2ban reload
It doesn’t take long before we are under attack.
Jan  5 11:50:49 server postfix/smtpd[27578]: connect from unknown[104.233.84.250]
Jan  5 11:50:53 server postfix/smtpd[27578]: warning: unknown[104.233.84.250]: SASL LOGIN authentication failed: XXXzx9dxxxQ6
2016-01-05 11:50:54,121 fail2ban.actions: WARNING [sasl] Ban 104.233.84.250
fail2ban includes a tool to check the status of the jail
fail2ban-client status sasl
Status for the jail: sasl
|- filter
|  |- File list:	/var/log/mail.log
|  |- Currently failed:	0
|  `- Total failed:	1
`- action
   |- Currently banned:	1
   |  `- IP list:	104.233.84.250
   `- Total banned:	1
We can also look at the firewall, to check how the ban is manifested.
$ iptables -L -n
...
Chain fail2ban-sasl (1 references)
target     prot opt source               destination
REJECT     all  --  104.233.84.250       0.0.0.0/0            reject-with icmp-port-unreachable
RETURN     all  --  0.0.0.0/0            0.0.0.0/0
We are now protected from brute-force attacks.
In addition, you should limit ssh access to pubkey authentication.